Tuesday, September 6, 2011

Cut and Dye

I went for a cute blonde pixie, a mix of Emma Watson and Winona Ryder.

Please ignore my puffy wisdom-teeth chipmunk cheeks.

Tuesday, August 23, 2011

Beetlejuice, Beetlejuice, Beetlejuice

 Today my look was inspired by my favorite movie. I wore a businessy pinstriped vest as a top over pale denim shorts, and I topped it with an awesome floppy hat I picked up at Kohl's for $16. But the best part (the bit I'm excited to talk about) is definitely my nails. I found some cheap white nail-art polish (it has a long, thin brush instead of the usual nail polish brush) for only $2 at Walgreen's, and I used it to make this stripey nail pattern.
I'd always been a little skeptical of these kinds of polishes, because to me it seemed like you were paying more money for less polish, and I had my doubts as to whether it actually worked like it said. Well, I found this Sinful nail polish in white on sale, so I figured I'd pay the two bucks to see if it actually worked. I'm glad I did. I had a lot of fun striping my nails. It was easy, dried quickly, and was fairly simple to control. I intend to use it again and again.

Saturday, August 13, 2011

More DIY

 Here's me in my home-altered shirt (see previous post for the shorts), getting ready for the Katy Perry concert (it was fantastic, if you were wondering). I also made the bangle, which I did by using red, brown, black, and orange colored sharpies to draw stripes and dots on a wooden bangle I bought at Beverly's for a few dollars.
 Here's the shirt tied in the front, also cute.
 Okay, so here's what you need: a shirt (as many sizes larger than yours as you can find; I used an XL), scissors, and bleach or dye if you want.

First, lay your shirt out flat. The shirt I used (Rite-Aid, $2.50) happened to be long as well as wide, so I cut off a few inches. Hold your shirt up to you before you cut, though, because some brands make large sizes run wide without actually making them longer, so make sure you don't cut off too much.

After it's long enough for the "points" on the sides of your shirt, mark a point on the front of the shirt where you want the shortest part of the shirt to be.
 Second, cut two curves, one in the front reaching from the bottom to the point you marked and one in the back, a little bit longer than the front curve. The reason the back is longer than the front is to get it to hang right. It's not going to cause too much of a problem if you mess up, but I like having more stomach exposed than back.
 Third, cut out the neck and sleeves. For the neck, I cut a little deeper on the front, though my neck ended up being very wide, so you could even cut it a little less. For the sleeves, I cut a diagonal line from the armpit out to the shoulders, like in the pictures. The sleeves are going to fall down so you don't want them to be too long.
Here's the shirt pre-bleach. I decided later that I wanted to do a bleach tie-dye look, so I squished it up with rubber bands, made a 50% bleach solution, and squeezed the bleach over the shirt. I let it sit until I was happy with it, then I rinsed it out and tossed it in the dryer. Looks good!

Thursday, August 4, 2011

Cool Cutoffs From Mom Jeans

 My mom found these jeans somewhere (yard sale or handed down to her or something) but the problem is, they're really ugly. Like super unflattering. They were too short for either of us, and the legs had weird curves in them that we just couldn't pull off. I was intrigued by the high waist and the button fly, though, so I decided to turn them into something a little more fun.


So first, I chopped off the legs and made them shorts.
 I cut them a little longer than I would wear shorts, thinking I'd roll them up a bit. After washing them a lot, they started fraying all over the place, so I decided to wear them like that. It was good that I cut them longer, because they frayed a good inch.
 Here's the cut-off jeans.
 My next step was to bleach them. Now, I am a youngun and have never bleached anything in my life except my hair. The first time, I stuck them in the washer, poured a little bleach on them, and ran the cycle. What I got was a fat bleached spot right near the crotch. If you use the washing machine, make sure to put the bleach in after it's filled with water, and don't be stupid like me. If you do that, you'd probably get a more even lightening, but I wanted it splotchy, so I put on gloves, filled a bowl with bleach, and dabbed it onto the shorts
 using a paper towel. Much more control that way. Again, though, be careful. Bleach works gradually, so put too much on and you might end up with a white spot you didn't want, even when it looked fine an hour ago. I wanted white spots, so I just went at it.

After I bleached it, I took a razor and cut some slits in it, and then I tossed it back in the wash. That kind of stops the bleach reaction and frays the cuts I made, giving it a ripped look. I also added some
pyramid studs to the pocket.

And here they are! Fun and easy. All you need is jeans, scissors, bleach, and anything you want to stick on it.

Wednesday, August 3, 2011

DIY Day Coming Up!

Tomorrow or the day after I'll be posting my DIY mom-jeans-to-cool-cutoffs project. It's super fun, and I hope you'll enjoy it, too!

Saturday, July 23, 2011

Time Travel

 I love this dress. I bought it the other day at a store called Crossroads, which is basically an upscale second-hand and outlet store. I got this beautiful day dress for $20. It's so soft and light, perfect for a heat wave like the one we're having in California. I matched it with some vintage-style drown t-strap pumps from Ross, $23, and a bright red headband (Target, $6) and matching lipstick (Revlon, drugstore, $7).
The earrings I'm wearing are adorable gold and red anchors. They're actually hanging from my second piercing, and the black circle you see is my first. I don't know much about these earrings, unfortunately. I found them in a box of jewelry my grandmother left behind when she moved. Very retro.

Thursday, July 21, 2011

Dressing Up WIth Menswear

A blazer can make any look instantly go from casual to sophisticated. Dressy, but not too fancy, a blazer in a classic black or a flirty pastel turns a summery day outfit into a perfect look for a night on the town. The trick is to find a fit that works for you. The more tailored to your shape, the better.
This floral tank was a major steal at only $3 from WalMart. The blazer was $20 at Target, and the bag is an old bowling ball bag I picked up at a thrift store for $4. I'm also wearing dark high-waisted cigarette jeans from Urban Outfitters, the most expensive article of clothing at $58. Not usually a big spender, I love these jeans because of how comfortable and long they are.

Saturday, July 16, 2011

Thrift Find #2

I got this blue checked silk skirt for $4. It feels wonderfully floaty and light, and it has a perfect cut with a high zippered waist and a mid-calf length. The brand of this one is Campus Casuals of California, and despite my research, I was unable to find out how old it is, though my guess would be around the 70s. The shirt is a black Zenana Outfitters top I got at a store in the mall called De Masque for $10. The lipstick I'm wearing is my favorite, Revlon 007 In The Red. It's bright, it's not too warm or cool, and it instantly classes up any look. Plus, it lasts all day and is only $6 or $7, depending on where you get it.

Wednesday, July 13, 2011

Thrift Find #1

I picked up this cute vintage-esque dress at the local thrift store for just a few bucks. I love it because it's modern enough to be stylish, but it's also got that old Hollywood feel to it. In order to bring out the retro, I added a black fascinator I got at Urban Outfitters. It's a headband rather than a clip, which is fortunate for me because things don't stick well in my hair if I have to fuss with them.

Sunday, July 10, 2011

Mixing Patterns

There's a rule that says stick to one bold piece and work around it. A lot of times that means people are afraid to mix it up with different patterns simultaneously. Never fear! Here's how to mix patterns like a pro.

First, modify your rule. You don't want more than one patterned piece at a time if the patterns compete. What that means is don't do two animal prints, or many different floral pieces. Both prints are equally attention-getting, so someone looking at them would be constantly distracted by everything going on. Also, even if the patterns aren't similar, you have to be careful about images that are so bright they compete similarly. Bright orange plaid doesn't usually go with electric blue polka dots!

Second, pick accessories and other elements to unify your patterns. In my outfit, I chose a black bowler hat to play on the parisienne look of the shirt. Because the shirt is more understated, I was able to shock with a bright flowery mini. Here's the look:

  I'm wearing a black bowler hat I picked up at Target ($17), a 3/4 sleeve black-and-white BDG tee from Urban Outfitters (on sale for $10!), and an Xhilaration skirt, also from Target ($15).
For a look like this, I would keep make-up and jewelry to a minimum. Bright make-up and bold accessories are similar to patterns themselves; too much can be overwhelming.


Happy mixing! I'd love to see the results!

Thursday, July 7, 2011

Gone Thrifting

I've found internet once again, but I'm not able to get my pictures off my camera at the moment.

Today I went thrift shopping, and I bought two skirts, a dress, a jacket, and a bag. I'd love to take some pictures, but I have a very limited wardrobe as I'm on vacation. Stay tuned for that! I have a lot of great things to share when I get back on Monday.

Monday, July 4, 2011

Hello, I didn't disappear off the face of the planet; I just have limited internet access.

I made 20 more flowers using the instructions I posted earlier. Super fun! I put them in a green bottle as a bouquet. I'll post pics when I can!

Thursday, June 30, 2011

Nailed


This isn't my entire collection of nail polish. I've picked these 7 nail polishes to review because they span a wide range of price and quality. From left to right, these nail polishes are ordered from least expensive to most expensive.


 This is the nail polish I'm currently wearing. I painted my nails with one coat of Revlon Metallic. This picture was taken about 3 days after painting, with no touch-ups or top coat.


 Love My Nails in Black Rage ($0.99)
*

I bought this at the beginning of my goth kick. This is definitely a case of you get what you pay for. The color's super thin, taking upwards of 5 coats to get even a decent translucent grey. I wouldn't recommend this even at $0.99, unless you're looking for a very sheer color.


 Confetti in Pink Paradise ($1.99)
**

This is also a super cheap nail polish. Like Love My Nails, this color is very sheer. However, if you use several coats, you can actually get a very nice opaque pink. I expected this one to chip in a few days, but I kept in on for a little over a week and it stayed in good condition. The reason I don't give this more than 2 stars is that you have to use a lot if you want it to show up, and it tends to look a little plasticky, especially if, like me, you tend to get it on the cuticle.


 Nabi in Star Glitter ($2.99)
*

This one was probably the most disappointing for me. I have two colors in this brand, the other being a bright orange I bought to finish out a rainbow. I was excited by the lovely stars in this color, but they don't really come out. I did manage to get some out, but they soon flaked off. You could easily give yourself several coats on each hand and not have any stars. As a clear top coat, it's not very good, because it's thin. The orange color I have served its purpose as part of a rainbow, but I wouldn't recommend it. It's bright, but it's thin and difficult to remove.


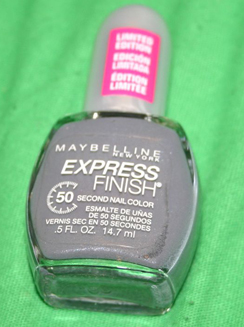
 Maybelline Express Finish in Gray-T Glamour ($5.99)
****

This is a brand I'd definitely buy often. In addition to this lovely limited-edition grey, I also have it in a metallic green, black, bright matte red, shimmery pale orange, and an iridescent green/purple. The nice thing about this line is that it dries fast (the bottle advertises 50 seconds, but I would gauge it more around 1.5 - 2 minutes). This is a higher-quality brand that stays on your nails longer and requires fewer coats. It does tend to chip at the edges without a top coat. This has a smoother finish than other brands.


 Revlon Top Speed in Metallic ($5.99)
***

Revlon is a good mid-price brand. I also have a shiny pinkish red from this line. This is my most recent purchase, and I'm happy with it. I chose it over a cheaper metallic silver because this polish is thicker and more like an actual silver color than a metallic glaze. It stays on your nails well, even with only one coat. My problem with this brand is that the majority of the colors are metallic or in some way shimmery. I tend to prefer matte colors, but Revlon seems to only offer matte colors in very light pastels.


 Sally Hansen Hard As Nails Xtreme Wear in Mellow Yellow ($6.99)
**

This is a pretty respected mid-price nail polish brand, but I've found it unable to live up to the hype. I've used a few different colors, but none really work any better than their lower-priced counterparts. I love this shade, and it looks good when freshly painted, but it chips very easily and is hard to take off. This brand markets itself as being tough and long-lasting, but it's really not. Don't wear this unless you're the type to redo your nails every few days.


OPI Nail Lacquer in You Rock-Apulco Red! ($8.99)
****

This is the most expensive nail polish I have, but it's worth it. You can get it from your local drugstore, but it is also the brand usually sold by nail salons and beauty supply stores. I've used a few colors over the years, and I regularly use the OPI top coat. This isn't my favorite color, but it's a good polish. It goes on thick and dries fairly quickly, and it lasts for a while, especially if you use more than one coat or add a top coat. I wouldn't use this brand all the time simply because there are cheaper brands that are comparable, but you can't really go wrong with OPI.

Sunday, June 26, 2011

Make a California Poppy - No Dirt Required

More on my orange kick! I learned how to make these today from some friendly park rangers at a fair. Fast, easy, and cheap, these can be used as a hair accessory or a pin, or you could throw some in a mason jar and have a fun decoration. I made mine in orange (it's a California poppy!) but you could make it any any color. Add more layers for a more ruffly flower.

 What you'll need:

Green pipecleaner
At least two pieces of colored tissue paper
 Step 1

Stack your papers on top of each other and make an accordion fold. The more folds your paper has, the more crinkly your flower will be.
 Step 2


Lay your folded paper across the pipecleaner, leaving enough room at the top to fold it over the paper and twist it to the rest of the pipecleaner stem.
 Step 3

Spread out your folded paper like a fan until it forms a circle. Flatten the folds.
 Step 4


Bend the petals of the flower up into a cup shape. You may have to flatten the folds some more if you can't get it to turn up.
 And ta-da!
Here's a close-up of the center of the finished flower.


If you make one, let me know! I'd love to see a picture!
Morgan Low-Rise Skinny Jeans in Rust
http://store.delias.com/item.do?itemID=51444&categoryID=1541&sizeFilter=&colorFilter=&brandFilter=

So, I don't often buy things online, and I never buy pants online. I'm unusually tall and skinny, meaning most pants don't fit me, so I'm not going to go buy pants without trying them on. However, I saw this and couldn't pass it up. It cost me $14, including shipping, and they had extended length sizes. This color was only available in sizes 00, 0, and 1, but each color has different availability, going up I believe to size 18.

I love the bright color of this. I could pair this with a black t-shirt and a bold necklace, or my favorite 3/4 sleeve black and white striped shirt. A breezy blouse in a pastel color and a metallic cuff bracelet would dress it up nicely. If I get them and it turns out that they're still too short to wear as pants, I could easily turn them into bold shorts, a perfect summer piece.

Friday, June 24, 2011

Some "Under Construction" Pics

 Here's one of my artwork designs for this blog. This is a photo of the drawing; hopefully, I'll be able to scan it and get some better quality.
This is my cat Roswell pretending she's me. She's my favorite thing in the world, except when she's being annoying, which is always. Right now she's trying to prevent me from typing by wedging herself between me and the keyboard and biting my arm.

Wednesday, June 22, 2011

 Hey guys, this is my first blog post on this page!
Here's me in the outfit I wore today. It's incredibly hot in the Bay Area right now, so I had to dress accordingly.

I'm wearing a white shirt from Target, I got it a little while ago, so I don't remember the price exactly, but it was on clearance for somewhere around 7 or 8 bucks. The skirt I'm wearing is from Charlotte Russe, $16.99. I got it a few days ago, so it's probably still there.

In addition I'm wearing a charm bracelet I made myself and a necklace given to me by my mom. The shoes I wore today were black simple flats from Payless, also $16.99. I cannot say how much every girl needs a pair of simple black flats that can be dressed up or down and match everything. Also, way more comfortable than heels!

There's nothing special about my makeup, except I used mood-
 changing lipstick from CVS, $1.99. It's orange in the tube and turns bright pink when you put it on. Not the highest quality, but fun.